| гУЪТМўЮЏЭаЪЕЯжСєбдАхЙІФмЁЃ 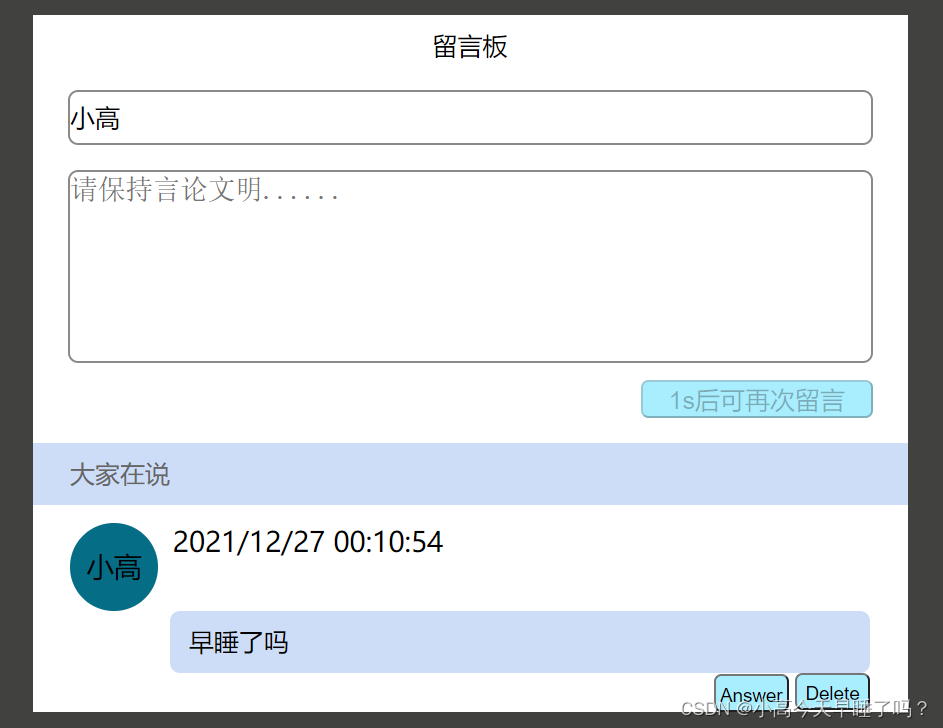
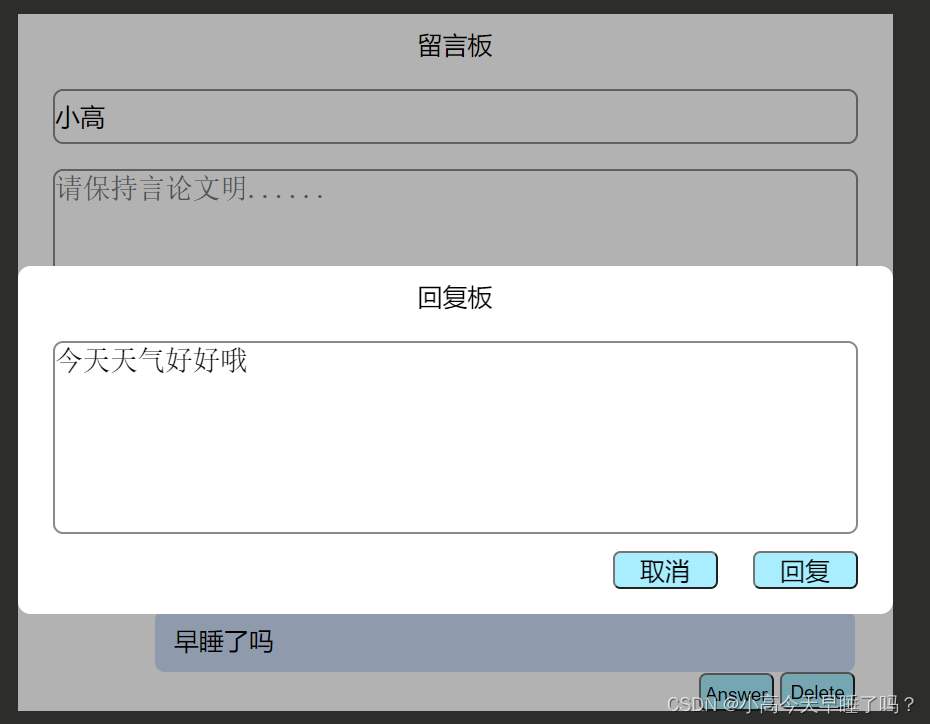
<!DOCTYPE html><html lang="en"><head> <meta charset="UTF-8"> <meta http-equiv="X-UA-Compatible" content="IE=edge"> <meta name="viewport" content="width=device-width, initial-scale=1.0"> <title>Document</title> <style> * { padding: 0; margin: 0; } body { width: 100%; height: 100%; background: rgb(65, 65, 63); } .bacground { width: 700px; height: 100%; background: white; margin: auto; margin-top: 20px; } .head, .pop-head { height: 50px; font-size: 20px; text-align: center; line-height: 50px; } .name { width: 640px; height: 40px; font-size: 20px; margin: 10px 28px; line-height: 50px; border-radius: 8px; border: 2px solid rgb(139, 137, 137); outline: none; } .content, .pop-reply { width: 640px; height: 150px; font-size: 22px; margin: 10px 28px; border: 2px solid rgb(139, 137, 137); outline: none; border-radius: 8px; resize: none; } .btn, .pop-btn { float: right; height: 30px; margin-right: 28px; border-radius: 6px; outline: none; font-size: 20px; padding: 0 20px; background: rgb(169, 238, 255); } h3 { font-size: 20px; color: rgb(102, 102, 102); background: rgb(205, 221, 248); margin-top: 50px; line-height: 50px; text-indent: 30px; font-weight: 545; } li { list-style: none; width: 640px; font-size: 22px; margin: 15px 30px; } .message-head { display: flex; } .message-head .photo { width: 70px; height: 70px; background: rgb(6, 109, 134); display: inline-block; border-radius: 50%; text-align: center; line-height: 70px; overflow: hidden; } .message-head .time { margin-left: 12px; } .liuyan, .reply p { width: 560px; /* height: 76px; */ line-height: 50px; display: block; background: rgb(205, 221, 248); font-size: 20px; margin-left: 80px; border-radius: 8px; text-indent: 15px; } .delete { width: 60px; height: 30px; display: block; line-height: 30px; margin-left: 580px; /* margin-bottom: 0px; */ border-radius: 6px; outline: none; font-size: 15px; background: rgb(169, 238, 255); } .answer { width: 60px; height: 30px; display: block; line-height: 30px; margin-top: -29px; margin-left: 515px; border-radius: 6px; outline: none; font-size: 15px; background: rgb(169, 238, 255); } .popup { width: 100vw; height: 100vh; position: fixed; background: rgba(0, 0, 0, .3); left: 0; top: 0; z-index: 10; display: flex; align-items: center; justify-content: center; display: none; } .pop-content { width: 700px; background: #fff; border-radius: 10px; overflow: hidden; padding-bottom: 20px; } .reply p { margin-top: 10px; background: rgba(100, 100, 100, .1); } </style></head><body> <div class="bacground"> <div class="head">СєбдАх</div> <input class="name" type="text" placeholder="ЧыЪфШыФњЕФъЧГЦ"> <textarea class="content" placeholder="ЧыБЃГжбдТлЮФУї......"></textarea> <button class="btn">Сєбд</button> <h3>ДѓМвдкЫЕ</h3> <ul class="text"> <!-- <li> <div class="message-head"> <span class="photo">ЯЕЭГ</span> <p class="time">2019-9-27 0:47:38</p> </div> <p class="liuyan">ВтЪдСєбд</p> <div class="reply"> <p>ВтЪдЛиИД</p> </div> <button class="delete">Delete</button> <button class="answer">Answer</button> </li> --> </ul> </div> <div class="popup"> <div class="pop-content"> <div class="pop-head">ЛиИДАх</div> <textarea class="pop-reply" placeholder="ЧыБЃГжбдТлЮФУї......"></textarea> <button class="pop-btn huiFu">ЛиИД</button> <button class="pop-btn quXiao">ШЁЯћ</button> </div> </div> <script> //дкЪТМўЮЏЭажаЃЌУПвЛИіifЖМЯрЕБгквЛИіЖРСЂЕФКЏЪ§ЃЌвђЮЊУПвЛДЮЕуЛїЖМЛсжиаТДЅЗЂЪТМўДІРэКЏЪ§ var oAns ; //ЗжЮіЃКЪТМўЮЏЭаИјЫЃП --- ЙВЭЌЕФИИдЊЫи document.onclick = function (e) { //ЪТМўДІРэЖдЯѓЃЌМцШнIE8МАвдЯТАцБОЕФфЏРРЦї e = e || event ; // targetФПБъ --- ОпЬхЪЧгЩФФИіБъЧЉДЅЗЂЕФ var target = e.target ; //Сєбд if(target.className === 'btn'){ //ЛёШЁЖдЯѓ var nickname = $('.name').value ; var content = $('.content').value ; //ХаЖЯЪфШыЪЧЗёЮЊПе if(nickname && content){ //ДДНЈвЛИіБъЧЉ var oLi = document.createElement('li') ; //ВхШыаТФкШн oLi.innerHTML = ` <div class="message-head"> <span class="photo">${nickname}</span> <p class="time">2019-9-27 0:47:38</p> </div> <p class="liuyan">${content}</p> <div class="reply"> </div> <button class="delete">Delete</button> <button class="answer">Answer</button> ` //НЋзюаТЕФСєбдВхШыЕНзюЩЯУц $('.text').insertBefore(oLi , $('.text').firstChild) ; //ЕЙМЦЪБ clock(target , 3) ; //СєбдЭъКѓЧхПеСєбдАхФкШн $('.content').value = '' ; }else{ alert('ЪфШыВЛФмЮЊПеЃЁ') } return } //ЩОГ§ if(target.className === 'delete'){ //ЩОçѺбд target.parentNode.remove() ; return } //ЛиИД if(target.className === 'answer'){ //ЯдЪОЕЏДА $('.popup').style.display = 'flex' ; //евЕНЛиИДСєбдЕФЕиЗН oAns = target.previousElementSibling.previousElementSibling ; return } //ШЗШЯЛиИД if(target.className === 'pop-btn huiFu'){ //ФУЕНЛиИДЕФФкШн var huiFuContent = $('.pop-reply').value ; if(huiFuContent){ //ДДНЈвЛИіБъЧЉ var oP = document.createElement('p') ; //НЋФкШнВхШыБъЧЉжа oP.innerHTML = huiFuContent ; //НЋЛиИДВхШыЕНСєбдЕФЕиЗН oAns.appendChild(oP) ; } //ЙиБеЕЏДА $('.popup').style.display = 'none' ; return } //ШЁЯћЛиИД if(target.className === 'pop-btn quXiao'){ $('.popup').style.display = 'none' ; return } } //ЕЙМЦЪБ function clock(ele , time){ if(!ele.disabled){ ele.disabled = true ; ele.innerHTML = time + 'sКѓПЩдйДЮСєбд' ; var t = setInterval(function () { time-- ; ele.innerHTML = time + 'sКѓПЩдйДЮСєбд' ; if(time <= 0){ clearInterval(t) ; ele.disabled = false ; ele.innerHTML = 'Сєбд' ; } },1000) } } //ЛёШЁЖдЯѓ function $(selector){ return document.querySelector(selector) ; } </script></body></html>змНс
БОЦЊЮФеТОЭЕНетРяСЫЃЌЯЃЭћФмЙЛИјФуДјРДАяжњЃЌвВЯЃЭћФњФмЙЛЖрЖрЙизЂ51zixue.netЕФИќЖрФкШн!
ЯТдиЕижЗ:
JavaScriptБеАќдРэМАзїгУЯъНт
NodeСЌНгMySQLВЂЗтзАЦфдіЩОИФВщЕФЪЕЯжДњТы |

