一、基本使用可以通过MutationObserver构造函数实例化,参数是一个回调函数。 let observer = new MutationObserver(() => console.log("change"));console.log(observer);observer对象原型链如下: MutationObserver实例: 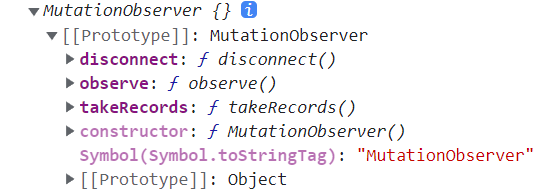
可以看到有disconnect、observer、takeRecords方法。 1. observer方法监听observer方法用于关联DOM元素,并根据相关设置进行监听。
语法如下: // 接收两个参数observer(DOM元素, MutationObserverInit对象); 其中: - 第一个参数DOM元素就是页面元素,比如:body、div等。
- 第二个参数就是设置要监听的范围。比如:属性、文本、子节点等,是一个键值对数组。
示例1,监听body元素class的变化: let observer = new MutationObserver(() => console.log("change"));// 监听body元素的属性变化observer.observe(document.body, { attributes: true});// 更改body元素的class,会异步执行创建MutationObserver对象时传入的回调函数document.body.className = "main";console.log("修改了body属性");// 控制台输出:// 修改了body属性// change上面 change 的输出是在 修改了body属性 之后,可见注册的回调函数是异步执行的,是在后面执行的。 2. 回调函数增加MutationRecord实例数组参数现在回调函数非常简单,就是输出一个字符串,看不出到底发生了什么变化。 其实回调函数接收一个 MutationRecord 实例数组,实务中可以通过这个查看详细的信息。 let observer = new MutationObserver( // 回调函数是一个 MutationRecord 实例数组。格式如下: // [MutationRecord, MutationRecord, MutationRecord, ...] (mutationRecords) => console.log(mutationRecords));observer.observe(document.body, { attributes: true});document.body.className = "main";console.log("修改了body属性");// 控制台输出:// 修改了body属性// (1) [MutationRecord]其中 mutationRecords信息 如下: MutationRecord实例: 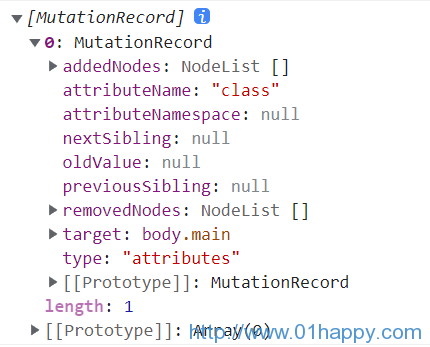
其中几个比较关键的信息: attributeName 表示修改的属性名称target 修改的目标type 类型 如果多次修改body的属性,那么会有多条记录: // MutationRecordlet observer = new MutationObserver( // 回调函数接收一个 MutationRecord 实例,是一个数组。 (mutationRecords) => console.log(mutationRecords));observer.observe(document.body, { attributes: true}); // 修改三次document.body.className = "main";document.body.className = "container";document.body.className = "box"; // 控制台打印如下:// (3) [MutationRecord, MutationRecord, MutationRecord]注意: 这里不是修改一次就执行一次回调,而是每修改一次就往 mutationRecords 参数加入一个 MutationRecord 实例,最后执行一次回调打印出来。 如果修改一次就执行一次回调,那么性能就会比较差。
3. disconnect方法终止回调如果要终止回调,可以使用disconnect方法。 let observer = new MutationObserver( (mutationRecords) => console.log(mutationRecords));observer.observe(document.body, { attributes: true});// 第一次修改document.body.className = "main"; // 终止observer.disconnect(); // 第二次修改document.body.className = "container"; // 没有日志输出这里没有日志输出,包括第一次修改也没有日志输出,因为回调函数的执行是异步的,是在最后执行的。后面把observer终止了,所以就不会执行了。 可以用setTimeout控制最后才终止,这样回调就会正常执行。 let observer = new MutationObserver( (mutationRecords) => console.log(mutationRecords));observer.observe(document.body, { attributes: true});// 第一次修改document.body.className = "main"; // 终止setTimeout(() => { observer.disconnect(); // 第三次修改,下面修改不会回调了 document.body.className = "container";}, 0); // 第二次修改document.body.className = "container"; // 页面输出:// (2) [MutationRecord, MutationRecord]终止之后再启用 终止了之后可以再次启动,请看下面示例: let observer = new MutationObserver( (mutationRecords) => console.log(mutationRecords));observer.observe(document.body, { attributes: true});// 第一次修改,会入 mutationRecords 数组document.body.className = "main";// 终止setTimeout(() => { observer.disconnect(); // 第二次修改,因为终止了,下面修改不会入 mutationRecords 数组 document.body.className = "container";}, 0);setTimeout(() => { // 再次启用 observer.observe(document.body, { attributes: true }); // 修改body属性,会入 mutationRecords 数组 document.body.className = "container";}, 0); // 控制台输出:// [MutationRecord]// [MutationRecord]这边回调函数是执行了两次,打印了两个,其中: - 第一个输出是在第一次修改,后面没有同步代码了,就执行了回调。
- 第二个输出是在第三次修改,因为重新启用了,所以就正常执行了回调。
第二次修改,因为observer被终止了,所以修改body的属性不会入 mutationRecords 数组。 4. takeRecords方法获取修改记录如果希望在终止observer之前,对已有的 mutationRecords 记录进行处理,可以用takeRecords方法获取。 let observer = new MutationObserver( (mutationRecords) => console.log(mutationRecords));observer.observe(document.body, { attributes: true}); // 第一次修改,会入 mutationRecords 数组document.body.className = "main";// 第二次修改,会入 mutationRecords 数组document.body.className = "container";// 第三次修改,会入 mutationRecords 数组document.body.className = "box";// 取到修改记录,可以对其进行处理let mutationRecords = observer.takeRecords();console.log(mutationRecords);// 控制台打印:// (3) [MutationRecord, MutationRecord, MutationRecord]console.log(observer.takeRecords());// 控制台打印:// []// 终止observer.disconnect();二、监听多个元素上面监听都是只有一个元素,如果要监听多个元素可以复用MutationObserver实例 let observer = new MutationObserver( (mutationRecords) => console.log(mutationRecords));// 创建 div1 元素,并监听let div1 = document.createElement("div");observer.observe(div1, { attributes: true});div1.id = "box1"; // 创建div2并监听let div2 = document.createElement("div");observer.observe(div2, { attributes: true});div2.id = "box2"; // 控制台打印:// (2) [MutationRecord, MutationRecord]控制台打印了两个MutationRecord,其中: - 第一个
MutationRecord 就是 div1 的id属性修改记录。 - 第二个
MutationRecord 就是 div2 的id属性修改记录。 其他使用方式和上面的类似。 三、监听范围MutationObserverInit对象上面的监听都是监听属性,当然也可以监听其他的东西,比如:文本、子节点等。 1. 观察属性上面的例子都是观察元素自有的属性,这里再举一个自定义属性的例子。 let observer = new MutationObserver( (mutationRecords) => console.log(mutationRecords));observer.observe(document.body, { attributes: true});// 修改自定义的属性document.body.setAttribute("data-id", 1); // 控制台打印:// [MutationRecord]修改自定义的属性一样会加入到 mutationRecords 数组。 另外值的一提的是 data-id 经常用来给元素标记一些数据啥的,如果发生变化,程序就可以监听到,就可以处理一些相应的逻辑。 attributeFilter过滤: 如果要监听指定的属性变化,可以用 attributeFilter 过滤。 let observer = new MutationObserver( (mutationRecords) => console.log(mutationRecords));observer.observe(document.body, { attributes: true, // 设置白名单 attributeFilter: ["data-id"]}); // 修改白名单 attributeFilter 内的属性,会入 mutationRecordsdocument.body.setAttribute("data-id", 1); // 修改不在白名单 attributeFilter 内的属性,不会入 mutationRecordsdocument.body.setAttribute("class", "main"); // 控制台打印:// [MutationRecord]attributeOldValue记录旧值: 如果要记录旧值,可以设置 attributeOldValue 为true。 let observer = new MutationObserver( // MutationRecord对象中oldValue表示旧值 (mutationRecords) => console.log(mutationRecords.map((x) => x.oldValue)));observer.observe(document.body, { attributes: true, attributeOldValue: true,});// 第一次修改,因为原来没有值,所以旧值 oldValue = nulldocument.body.setAttribute("class", "main");// 第二次修改,因为前面有改了一次,所以旧值 oldValue = maindocument.body.setAttribute("class", "container"); // 控制台打印:// (2) [null, 'main']2. 观察文本观察文本设置 characterData 为 true 即可,不过只能观察文本节点。 请看如下示例: <!-- 一个性感的div --><div id="box">Hello</div><script type="text/javascript"> let observer = new MutationObserver( (mutationRecords) => console.log(mutationRecords) ); // 获取文本节点 let textNode = document.getElementById("box").childNodes[0]; observer.observe(textNode, { // 观察文本变化 characterData: true }); // 修改文本 textNode.textContent = "Hi"; // 控制台打印: // [MutationRecord]</script>如果直接监听div元素,那么是不生效的: <!-- 一个性感的div --><div id="box">Hello</div><script type="text/javascript"> let observer = new MutationObserver( (mutationRecords) => console.log(mutationRecords) ); // 监听div不会生效 let box = document.getElementById("box"); observer.observe(box, { characterData: true }); box.textContent = "Hi"; // 控制台无输出</script>characterDataOldValue记录旧值: 如果要记录文本旧值,可以设置 characterDataOldValue 为true。 <!-- 一个性感的div --><div id="box">Hello</div> <script type="text/javascript"> let observer = new MutationObserver( (mutationRecords) => console.log(mutationRecords.map((x) => x.oldValue)) ); // 获取文本节点 let textNode = document.getElementById("box").childNodes[0]; observer.observe(textNode, { // 观察文本变化 characterData: true, // 保留旧数据 characterDataOldValue: true, }); // 修改文本两次 textNode.textContent = "Hi"; textNode.textContent = "Nice"; // 控制台打印: // (2) ['Hello', 'Hi']</script>因为div内的内容原本为Hello,先修改为Hi,又修改为Nice,所以两次修改的旧值就为:Hello 和 Hi 了。 3. 观察子节点MutationObserver 实例也可以观察目标节点子节点的变化。
<!-- 一个性感的div --><div id="box">Hello</div><script type="text/javascript"> let observer = new MutationObserver( (mutationRecords) => console.log(mutationRecords) ); // 获取div let box = document.getElementById("box"); observer.observe(box, { // 观察子节点变化 childList: true, }); // 添加元素 let span = document.createElement("span") span.textContent = "world"; box.appendChild(span); // 控制台打印: // [MutationRecord]</script>MutationRecord中的addedNodes属性记录了增加的节点。
移除节点: <!-- 一个性感的div --><div id="box">Hello</div> <script type="text/javascript"> let observer = new MutationObserver( (mutationRecords) => console.log(mutationRecords) ); // 获取div let box = document.getElementById("box"); observer.observe(box, { // 观察子节点变化 childList: true, }); // 移除第一个子节点,就是Hello文本节点 box.removeChild(box.childNodes[0]); // 控制台打印: // [MutationRecord]</script>MutationRecord中的removedNodes属性记录了移除的节点。
移动节点: 对于已有的节点进行移动,那么会记录两条MutationRecord记录,因为移动现有的节点是先删除,后添加。 <!-- 一个性感的div --><div id="box">Hello<span>world</span></div> <script type="text/javascript"> let observer = new MutationObserver( (mutationRecords) => console.log(mutationRecords) ); // 获取div let box = document.getElementById("box"); observer.observe(box, { // 观察子节点变化 childList: true, }); // 将span节点移动到Hello节点前面 box.insertBefore(box.childNodes[1], box.childNodes[0]); // 移动节点,实际是先删除,后添加。 // 控制台打印: // (2) [MutationRecord, MutationRecord]</script>4. 观察子树上面观察的节点都是当前设置的目标节点,比如body,就只能观察body元素和其子节点的变化。 如果要观察body及其所有后代节点的变化,那么可以设置subtree属性为true。 <!-- 一个性感的div --><div id="box">Hello<span>world</span></div> <script type="text/javascript"> let observer = new MutationObserver( (mutationRecords) => console.log(mutationRecords) ); let box = document.getElementById("box"); observer.observe(box, { attributes: true, // 观察子树的变化 subtree: true }); // span元素的id属性变化就可以观察到 box.childNodes[1].id = "text"; // 控制台打印: // [MutationRecord]</script>subtree设置为true后,不光div元素本身,span元素也可以观察到了。
总结: - 1.
MutationObserver实例可以用来观察对象。 - 2.
MutationRecord实例记录了每一次的变化。 - 3. 回调函数需要所有脚本任务完成后,才会执行,即采用异步方式。
- 4. 可以观察的访问有属性、文本、子节点、子树。
到此这篇关于JavaScript中MutationObServer监听DOM元素详情的文章就介绍到这了,更多相关JavaScript中MutationObServer监听DOM元素内容请搜索51zixue.net以前的文章或继续浏览下面的相关文章希望大家以后多多支持51zixue.net!
下载地址:
JavaScript中document.activeELement焦点元素介绍
关于JavaScript |

