етЦЊНЬГЬPythonЭГМЦДЪЦЕВЂЛцжЦЭМЦЌ(ИНЭъећДњТы)аДЕУКмЪЕгУЃЌЯЃЭћФмАяЕНФњЁЃ
аЇЙћ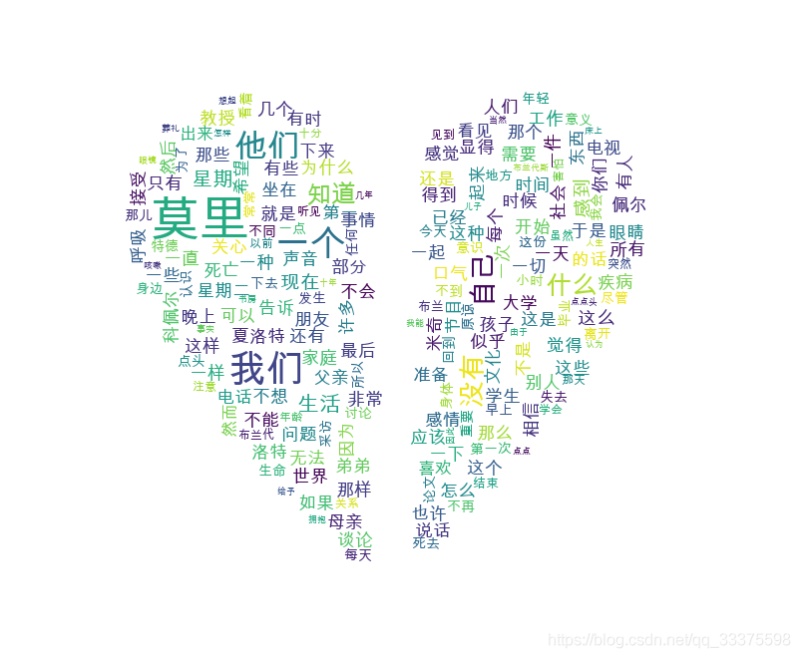
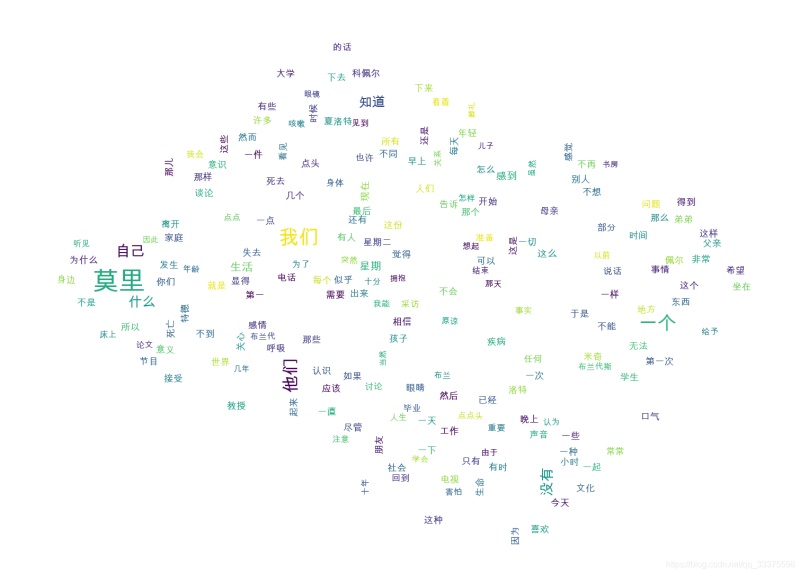

1 ЪЕЯжДњТыЖСШЁtxtЮФМўЃК def readText(text_file_path): with open(text_file_path, encoding='gbk') as f: # content = f.read() return content ЕУЕНЮФеТЕФДЪЦЕЃК def getRecommondArticleKeyword(text_content, key_word_need_num = 10, custom_words = [], stop_words =[], query_pattern = 'searchEngine'): ''' :param text_content: ЮФБОзжЗћДЎ :param key_word_need_num: ашвЊЕФЙиМќДЪЪ§СП :param custom_words: здЖЈвхЙиМќДЪ :param stop_words: ВЛВщбЏЙиМќДЪ :param query_pattern: precision:ОЋШЗФЃЪНЁЊЁЊЁЊЁЊЪдЭМНЋОфзгзюОЋШЗЕиЧаПЊЃЌЪЪКЯЮФБОЗжЮіЃЛ entireЃКШЋФЃЪНЁЊЁЊЁЊЁЊАбОфзгжаЫљгаЕФПЩвдГЩДЪЕФДЪгяЖМЩЈУшГіРД, ЫйЖШЗЧГЃПьЃЌЕЋЪЧВЛФмНтОіЦчвхЃЛ searchEngine:ЫбЫїв§ЧцФЃЪНЁЊЁЊЁЊЁЊдкОЋШЗФЃЪНЕФЛљДЁЩЯЃЌЖдГЄДЪдйДЮЧаЗжЃЌЬсИпейЛиТЪЃЌЪЪКЯгУгкЫбЫїв§ЧцЗжДЪЃЛ paddleФЃЪНЁЊЁЊЁЊЁЊРћгУPaddlePaddleЩюЖШбЇЯАПђМмЃЌбЕСЗађСаБъзЂЃЈЫЋЯђGRUЃЉЭјТчФЃаЭЪЕЯжЗжДЪЁЃЭЌЪБжЇГжДЪадБъзЂЁЃ :return: ''' # jieba.enable_paddle() # paddle.fluid.install_check.run_check() if not isinstance(text_content, str): raise ValueError('ЮФБОзжЗћДЎРраЭДэЮѓЃЁ') if not isinstance(key_word_need_num, int): raise ValueError('ЙиМќДЪИіЪ§РраЭДэЮѓЃЁ') if not isinstance(custom_words, list): raise ValueError('здЖЈвхЙиМќДЪРраЭДэЮѓЃЁ') if not isinstance(stop_words, list): raise ValueError('ЦСБЮЙиМќДЪРраЭДэЮѓЃЁ') if not isinstance(query_pattern, str): raise ValueError('ВщбЏФЃЪНРраЭДэЮѓЃЁ') # ЬэМгздЖЈвхЙиМќДЪ for word in custom_words: jieba.add_word(word) if query_pattern == 'searchEngine': key_words = jieba.cut_for_search(text_content) elif query_pattern == 'entire': key_words = jieba.cut(text_content, cut_all=True, use_paddle=True) elif query_pattern == 'precision': key_words = jieba.cut(text_content, cut_all=False, use_paddle=True) else: return [] # print("В№ЗжКѓЕФДЪ: %s" % " ".join(key_words)) # Й§ТЫКѓЕФЙиМќДЪ stop_words = set(stop_words) word_count = Counter() for word in key_words: if len(word) > 1 and word not in stop_words: word_count[word] += 1 # res_words = list() # for data in word_count.most_common(key_word_need_num): # res_words.append(data[0]) # return res_words return word_countЛцжЦЭМЦЌЃК def drawWordsCloud(word_count, save_img_filePath='', img_mask_filePath=''): # print(word_count) # print(type(word_count)) if len(img_mask_filePath) != 0: img_mask = np.array(Image.open(img_mask_filePath)) #ДђПЊекежЭМЦЌ,НЋЭМЦЌзЊЛЛЮЊЪ§зщ wc = wordcloud.WordCloud(font_path='/Library/Fonts/Arial Unicode.ttf',# ЩшжУжаЮФзжЬхЃЌДЪдЦФЌШЯзжЬхЪЧЁАDroidSansMono.ttfзжЬхПтЁБЃЌВЛжЇГжжаЮФ background_color="white", # ЩшжУБГОАбеЩЋ max_words=200, # ЩшжУзюДѓЯдЪОЕФзжЪ§ max_font_size=50, # ЩшжУзжЬхзюДѓжЕ random_state=30, # ЩшжУгаЖрЩйжжЫцЛњЩњГЩзДЬЌЃЌМДгаЖрЩйжжХфЩЋЗНАИ width=400, height=200, mask=img_mask ) else: wc = wordcloud.WordCloud(font_path='/Library/Fonts/Arial Unicode.ttf',# ЩшжУжаЮФзжЬхЃЌДЪдЦФЌШЯзжЬхЪЧЁАDroidSansMono.ttfзжЬхПтЁБЃЌВЛжЇГжжаЮФ background_color="white", # ЩшжУБГОАбеЩЋ max_words=200, # ЩшжУзюДѓЯдЪОЕФзжЪ§ max_font_size=50, # ЩшжУзжЬхзюДѓжЕ random_state=30, # ЩшжУгаЖрЩйжжЫцЛњЩњГЩзДЬЌЃЌМДгаЖрЩйжжХфЩЋЗНАИ width=400, height=200 ) # ЛцЭМ wc.generate_from_frequencies(word_count) #ДгзжЕфЩњГЩДЪдЦ plt.imshow(wc) #ЯдЪОДЪдЦ plt.axis('off') #ЙиБезјБъжс plt.show() #ЯдЪОЭМЯё # БЃДцЭМЦЌ if len(save_img_filePath) != 0: wc.to_file(save_img_filePath) else: pass2 ЭъећДњТы#-*- coding : utf-8-*-import jiebafrom collections import Counterimport paddleimport wordcloud #ДЪдЦеЙЪОПтimport matplotlib.pyplot as plt #ЭМЯёеЙЪОПтimport timefrom PIL import Imageimport numpy as npdef timer(func): def calculateTime(*args, **kwargs): t = time.perf_counter() result = func(*args, **kwargs) print(f'func {func.__name__} coast time:{time.perf_counter() - t:.8f} s') return result return calculateTimedef readText(text_file_path): with open(text_file_path, encoding='gbk') as f: # content = f.read() return content@timerdef getRecommondArticleKeyword(text_content, key_word_need_num = 10, custom_words = [], stop_words =[], query_pattern = 'searchEngine'): ''' :param text_content: ЮФБОзжЗћДЎ :param key_word_need_num: ашвЊЕФЙиМќДЪЪ§СП :param custom_words: здЖЈвхЙиМќДЪ :param stop_words: ВЛВщбЏЙиМќДЪ :param query_pattern: precision:ОЋШЗФЃЪНЁЊЁЊЁЊЁЊЪдЭМНЋОфзгзюОЋШЗЕиЧаПЊЃЌЪЪКЯЮФБОЗжЮіЃЛ entireЃКШЋФЃЪНЁЊЁЊЁЊЁЊАбОфзгжаЫљгаЕФПЩвдГЩДЪЕФДЪгяЖМЩЈУшГіРД, ЫйЖШЗЧГЃПьЃЌЕЋЪЧВЛФмНтОіЦчвхЃЛ searchEngine:ЫбЫїв§ЧцФЃЪНЁЊЁЊЁЊЁЊдкОЋШЗФЃЪНЕФЛљДЁЩЯЃЌЖдГЄДЪдйДЮЧаЗжЃЌЬсИпейЛиТЪЃЌЪЪКЯгУгкЫбЫїв§ЧцЗжДЪЃЛ paddleФЃЪНЁЊЁЊЁЊЁЊРћгУPaddlePaddleЩюЖШбЇЯАПђМмЃЌбЕСЗађСаБъзЂЃЈЫЋЯђGRUЃЉЭјТчФЃаЭЪЕЯжЗжДЪЁЃЭЌЪБжЇГжДЪадБъзЂЁЃ :return: ''' # jieba.enable_paddle() # paddle.fluid.install_check.run_check() if not isinstance(text_content, str): raise ValueError('ЮФБОзжЗћДЎРраЭДэЮѓЃЁ') if not isinstance(key_word_need_num, int): raise ValueError('ЙиМќДЪИіЪ§РраЭДэЮѓЃЁ') if not isinstance(custom_words, list): raise ValueError('здЖЈвхЙиМќДЪРраЭДэЮѓЃЁ') if not isinstance(stop_words, list): raise ValueError('ЦСБЮЙиМќДЪРраЭДэЮѓЃЁ') if not isinstance(query_pattern, str): raise ValueError('ВщбЏФЃЪНРраЭДэЮѓЃЁ') # ЬэМгздЖЈвхЙиМќДЪ for word in custom_words: jieba.add_word(word) if query_pattern == 'searchEngine': key_words = jieba.cut_for_search(text_content) elif query_pattern == 'entire': key_words = jieba.cut(text_content, cut_all=True, use_paddle=True) elif query_pattern == 'precision': key_words = jieba.cut(text_content, cut_all=False, use_paddle=True) else: return [] # print("В№ЗжКѓЕФДЪ: %s" % " ".join(key_words)) # Й§ТЫКѓЕФЙиМќДЪ stop_words = set(stop_words) word_count = Counter() for word in key_words: if len(word) > 1 and word not in stop_words: word_count[word] += 1 # res_words = list() # for data in word_count.most_common(key_word_need_num): # res_words.append(data[0]) # return res_words return word_countdef drawWordsCloud(word_count, save_img_filePath='', img_mask_filePath=''): # print(word_count) # print(type(word_count)) if len(img_mask_filePath) != 0: img_mask = np.array(Image.open(img_mask_filePath)) #ДђПЊекежЭМЦЌ,НЋЭМЦЌзЊЛЛЮЊЪ§зщ wc = wordcloud.WordCloud(font_path='/Library/Fonts/Arial Unicode.ttf',# ЩшжУжаЮФзжЬхЃЌДЪдЦФЌШЯзжЬхЪЧЁАDroidSansMono.ttfзжЬхПтЁБЃЌВЛжЇГжжаЮФ background_color="white", # ЩшжУБГОАбеЩЋ max_words=200, # ЩшжУзюДѓЯдЪОЕФзжЪ§ max_font_size=50, # ЩшжУзжЬхзюДѓжЕ random_state=30, # ЩшжУгаЖрЩйжжЫцЛњЩњГЩзДЬЌЃЌМДгаЖрЩйжжХфЩЋЗНАИ width=400, height=200, mask=img_mask ) else: wc = wordcloud.WordCloud(font_path='/Library/Fonts/Arial Unicode.ttf',# ЩшжУжаЮФзжЬхЃЌДЪдЦФЌШЯзжЬхЪЧЁАDroidSansMono.ttfзжЬхПтЁБЃЌВЛжЇГжжаЮФ background_color="white", # ЩшжУБГОАбеЩЋ max_words=200, # ЩшжУзюДѓЯдЪОЕФзжЪ§ max_font_size=50, # ЩшжУзжЬхзюДѓжЕ random_state=30, # ЩшжУгаЖрЩйжжЫцЛњЩњГЩзДЬЌЃЌМДгаЖрЩйжжХфЩЋЗНАИ width=400, height=200 ) # ЛцЭМ wc.generate_from_frequencies(word_count) #ДгзжЕфЩњГЩДЪдЦ plt.imshow(wc) #ЯдЪОДЪдЦ plt.axis('off') #ЙиБезјБъжс plt.show() #ЯдЪОЭМЯё # БЃДцЭМЦЌ if len(save_img_filePath) != 0: wc.to_file(save_img_filePath) else: passif __name__ == '__main__': pass # /Users/mac/Downloads/work/retailSoftware/ЙЋЫОЯюФП/test.txt text_file_path = "/Users/mac/Downloads/ЕчзгЪщ/БрГЬЫМЯы/ЯрдМаЧЦкЖў/ЯрдМаЧЦкЖў.txt" # text_file_path = "/Users/mac/Downloads/work/retailSoftware/ЙЋЫОЯюФП/test3.txt" text_content = readText(text_file_path) # print(text_content) # print(JNI_API_getRecommondArticleKeyword(text_content)) img_mask_filePath = '/Users/mac/Desktop/НиЦС2021-08-20 ЯТЮч4.02.10.png' img_save_filePath = '/Users/mac/Downloads/test9.png' drawWordsCloud(getRecommondArticleKeyword(text_content), img_save_filePath, img_mask_filePath)ЕНДЫетЦЊЙигкPythonЭГМЦДЪЦЕВЂЛцжЦЭМЦЌ(ИНЭъећДњТы)ЕФЮФеТОЭНщЩмЕНетСЫ,ИќЖрЯрЙиPythonЭГМЦДЪЦЕЛцжЦЭМЦЌФкШнЧыЫбЫї51zixue.netвдЧАЕФЮФеТЛђМЬајфЏРРЯТУцЕФЯрЙиЮФеТЯЃЭћДѓМввдКѓЖрЖржЇГж51zixue.netЃЁ
вЛЦЊЮФеТДјФуСЫНтpythonе§дђБэДяЪНЕФе§ШЗгУЗЈ
СуЛљДЁбЇЯАPythonХРГц |


