这篇教程人脸识别实战之Opencv+SVM实现人脸识别写得很实用,希望能帮到您。
前言在本文中,您将学习如何使用 OpenCV 进行人脸识别。文章分三部分介绍: 第一,将首先执行人脸检测,使用深度学习从每个人脸中提取人脸量化为128位的向量。 第二, 在嵌入基础上使用支持向量机(SVM)训练人脸识别模型。 第三,最后使用 OpenCV 识别图像和视频流中的人脸。
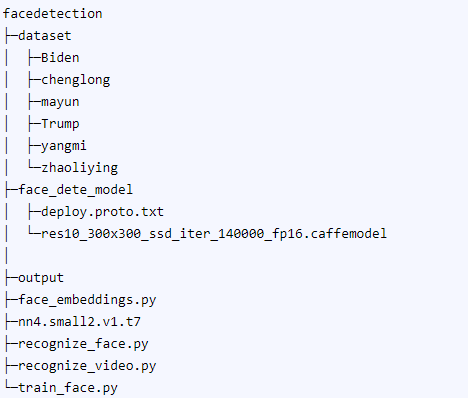
项目结构
编码新建face_embeddings.py脚本,写入如下代码: # import the necessary packagesimport numpy as npimport pickleimport cv2import osimport os 导入需要的包。然后定义几个函数: def list_images(basePath, contains=None): # return the set of files that are valid return list_files(basePath, validExts=image_types, contains=contains)def list_files(basePath, validExts=None, contains=None): # loop over the directory structure for (rootDir, dirNames, filenames) in os.walk(basePath): # loop over the filenames in the current directory for filename in filenames: # if the contains string is not none and the filename does not contain # the supplied string, then ignore the file if contains is not None and filename.find(contains) == -1: continue # determine the file extension of the current file ext = filename[filename.rfind("."):].lower() # check to see if the file is an image and should be processed if validExts is None or ext.endswith(validExts): # construct the path to the image and yield it imagePath = os.path.join(rootDir, filename) yield imagePathdef resize(image, width=None, height=None, inter=cv2.INTER_AREA): dim = None (h, w) = image.shape[:2] # 如果高和宽为None则直接返回 if width is None and height is None: return image # 检查宽是否是None if width is None: # 计算高度的比例并并按照比例计算宽度 r = height / float(h) dim = (int(w * r), height) # 高为None else: # 计算宽度比例,并计算高度 r = width / float(w) dim = (width, int(h * r)) resized = cv2.resize(image, dim, interpolation=inter) # return the resized image return resizedlist_images函数,读取数据集文件夹下面的图片。 resize函数,等比例resize图片。接下来定义一些变量: dataset_path='dataset'embeddings_path='output/embeddings.pickle'detector_path='face_dete_model'embedding_model='nn4.small2.v1.t7'confidence_low=0.5 dataset_path:数据集路径 embeddings_path:输出编码文件的路径 detector_path:人脸检测模型的路径 embedding_model:编码模型 confidence_low:最低的置信度。 接下来就是代码的最重要的部分: print("loading face detector...")protoPath = os.path.sep.join([detector_path, "deploy.proto.txt"])modelPath = os.path.sep.join([detector_path,"res10_300x300_ssd_iter_140000_fp16.caffemodel"])detector = cv2.dnn.readNetFromCaffe(protoPath, modelPath)# 加载序列化的人脸编码模型print("loading face recognizer...")embedder = cv2.dnn.readNetFromTorch(embedding_model)# 获取数据集中输入图像的路径print("quantifying faces...")imagePaths = list(list_images(dataset_path))# 初始化我们提取的面部编码列表和相应的人名knownEmbeddings = []knownNames = []# 初始化处理的人脸总数total = 0# loop over the image pathsfor (i, imagePath) in enumerate(imagePaths): # extract the person name from the image path print("processing image {}/{}".format(i + 1,len(imagePaths))) name = imagePath.split(os.path.sep)[-2] # 加载图像,将其调整为宽度为 600 像素(同时保持纵横比),然后抓取图像尺寸 image = cv2.imread(imagePath) image = resize(image, width=600) (h, w) = image.shape[:2] # 从图像构建一个 blob imageBlob = cv2.dnn.blobFromImage( cv2.resize(image, (300, 300)), 1.0, (300, 300), (104.0, 177.0, 123.0), swapRB=False, crop=False) # 使用 OpenCV 的基于深度学习的人脸检测器来定位输入图像中的人脸 detector.setInput(imageBlob) detections = detector.forward() # ensure at least one face was found if len(detections) > 0: # 假设每个图像只有一张脸,所以找到概率最大的边界框 i = np.argmax(detections[0, 0, :, 2]) confidence = detections[0, 0, i, 2] # 确保最大概率的检测也意味着我们的最小概率测试(从而帮助过滤掉弱检测) if confidence > confidence_low: # 计算人脸边界框的 (x, y) 坐标 box = detections[0, 0, i, 3:7] * np.array([w, h, w, h]) (startX, startY, endX, endY) = box.astype("int") # 提取人脸ROI并抓取ROI维度 face = image[startY:endY, startX:endX] (fH, fW) = face.shape[:2] # 确保人脸宽度和高度足够大 if fW < 20 or fH < 20: continue # 为人脸 ROI 构造一个 blob,然后将 blob 通过我们的人脸嵌入模型来获得人脸的 128-d 量化 faceBlob = cv2.dnn.blobFromImage(face, 1.0 / 255, (96, 96), (0, 0, 0), swapRB=True, crop=False) embedder.setInput(faceBlob) vec = embedder.forward() # 将人名+对应的人脸嵌入添加到各自的列表中 knownNames.append(name) knownEmbeddings.append(vec.flatten()) total += 1# 保存编码文件print("serializing {} encodings...".format(total))data = {"embeddings": knownEmbeddings, "names": knownNames}f = open(embeddings_path, "wb")f.write(pickle.dumps(data))f.close()加载人脸检测器和编码器: 检测器:使用基于Caffe的DL人脸检测器来定位图像中的人脸。 编码器:模型基于Torch,负责通过深度学习特征提取来提取人脸编码。 接下来,让我们抓取图像路径并执行初始化。 遍历 imagePaths。从路径中提取人名。 构造了一个 blob。 然后,通过将 imageBlob 通过检测器网络来检测图像中的人脸。 检测列表包含定位图像中人脸的概率和坐标。 假设我们至少有一个检测,将进入 if 语句的主体。 假设图像中只有一张脸,因此提取具有最高置信度的检测并检查以确保置信度满足用于过滤弱检测的最小概率阈值。 假设已经达到了这个阈值,提取面部 ROI 并抓取/检查尺寸以确保面部 ROI 足够大。 然后,我们将利用编码器 并提取人脸编码。 继续构建另一个 blob。 随后,将 faceBlob 通过编码器 。 这会生成一个 128 维向量 (vec) 来描述面部。 然后我们简单地将名称和嵌入 vec 分别添加到 knownNames 和 knownEmbeddings 中。 继续循环图像、检测人脸并为数据集中的每个图像提取人脸编码的过程。 循环结束后剩下的就是将数据转储到磁盘。 运行结果: loading face detector... loading face recognizer... quantifying faces... processing image 1/19 processing image 2/19 processing image 3/19 processing image 4/19 processing image 5/19 processing image 6/19 processing image 7/19 processing image 8/19 processing image 9/19 processing image 10/19 processing image 11/19 processing image 12/19 processing image 13/19 processing image 14/19 processing image 15/19 processing image 16/19 processing image 17/19 processing image 18/19 processing image 19/19 serializing 19 encodings... Process finished with exit code 0
训练人脸识别模型已经为每张脸提取了 128 维编码
Python线程编程之Thread详解
用python画了个圣诞树给女朋友 |

