这篇教程一小时学会TensorFlow2之基本操作2实例代码写得很实用,希望能帮到您。
索引操作
简单索引索引 (index) 可以帮助我们快速的找到张量中的特定信息. 例子: a = tf.reshape(tf.range(12), [2, 2, 3])print(a)print(a[0])print(a[0][0]) 输出结果: tf.Tensor(
[[[ 0 1 2]
[ 3 4 5]] [[ 6 7 8]
[ 9 10 11]]], shape=(2, 2, 3), dtype=int32)
tf.Tensor(
[[0 1 2]
[3 4 5]], shape=(2, 3), dtype=int32)
tf.Tensor([0 1 2], shape=(3,), dtype=int32)
Numpy 式索引我们也可以按照 numpy 的写法来操作索引. 例子: a = tf.reshape(tf.range(12), [2, 2, 3])print(a)print(a[0])print(a[0, 0]) 输出结果: tf.Tensor(
[[[ 0 1 2]
[ 3 4 5]] [[ 6 7 8]
[ 9 10 11]]], shape=(2, 2, 3), dtype=int32)
tf.Tensor(
[[0 1 2]
[3 4 5]], shape=(2, 3), dtype=int32)
tf.Tensor([0 1 2], shape=(3,), dtype=int32)
使用 : 进行索引例子: c = tf.ones([4, 14, 14, 4])print(c[0, :, :, :].shape)print(c[0, 1, :, :].shape) 输出结果: (14, 14, 4)
(14, 4)
tf.gather我们假设一个有 3 个餐馆, 每个餐馆有 8 种菜系, 128 道菜data: [resturants, cuisines, dishes]. 
例子: data = tf.zeros([3, 8, 128])g1 = tf.gather(data, axis=0, indices=[0, 2])print(g1.shape)g2 = tf.gather(data, axis=1, indices=[0, 1, 2, 3])print(g2.shape) 输出结果: (2, 8, 128)
(3, 4, 128)
tf.gather_nd例子: g1 = tf.gather_nd(data, [0])print(g1.shape)g2 = tf.gather_nd(data, [0, 1])print(g2.shape)g3 = tf.gather_nd(data, [0, 1, 2])print(g3.shape) 输出结果: (8, 128)
(128,)
()
tf.boolean_mask格式: tf.boolean_mask( tensor, mask, axis=None, name='boolean_mask') 例子: data = tf.zeros([3, 8, 128])b1 = tf.boolean_mask(data, mask=[True, True, False])print(b1.shape)b2 = tf.boolean_mask(data, mask=[True, False, True, False, True, False, True, False], axis=1)print(b2.shape) 输出结果: (2, 8, 128)
(3, 4, 128)
切片操作借助切片技术, 我们可以灵活的处理张量对象. 
简单切片格式: 其中 start 为开始索引, end 为结束索引 (不包括) 例子: tf.Tensor([0 1 2], shape=(3,), dtype=int32)tf.Tensor([9], shape=(1,), dtype=int32)tf.Tensor([0 1 2 3 4 5 6 7 8], shape=(9,), dtype=int32)
step 切片格式: tensor[start : end: step] 例子: d = tf.range(6)print(d[::-1]) # 实现倒序print(d[::2]) # 步长为2 输出结果: tf.Tensor([5 4 3 2 1 0], shape=(6,), dtype=int32)
tf.Tensor([0 2 4], shape=(3,), dtype=int32)
维度变换
tf.reshapetf.reshape 可以帮助我们进行维度转换. 格式: tf.reshape( tensor, shape, name=None) 参数: - tensor: 传入的张量
- shape: 张量的形状
- name: 数据名称
例子: a = tf.random.normal([3, 8, 128])print(a.shape)b = tf.reshape(a, [3, 1024])print(b.shape)c = tf.reshape(a, [3, -1])print(c.shape) 输出结果: (3, 8, 128)
(3, 1024)
(3, 1024)
tf.transpose格式: tf.transpose( a, perm=None, conjugate=False, name='transpose') 例子: a = tf.random.normal([4, 3, 2, 1])print(a.shape)b = tf.transpose(a)print(b.shape)c = tf.transpose(a, perm=[0, 1, 3, 2])print(c.shape) 输出结果: (4, 3, 2, 1)
(1, 2, 3, 4)
(4, 3, 1, 2)
tf.expand_dims格式: tf.expand_dims( input, axis, name=None) 参数: - input: 输入
- axis: 操作的维度
- name: 数据名称
例子: a = tf.random.normal([4, 3, 2, 1])print(a.shape)b = tf.expand_dims(a, axis=0)print(b.shape)c = tf.expand_dims(a, axis=1)print(c.shape)d = tf.expand_dims(a, axis=-1)print(d.shape) 输出结果: (4, 3, 2, 1)
(1, 4, 3, 2, 1)
(4, 1, 3, 2, 1)
(4, 3, 2, 1, 1)
tf.squeezetf.squeeze 可以帮助我们删去所有维度为1 的维度. 
格式: tf.squeeze( input, axis=None, name=None) 参数: - input: 输入
- axis: 操作的维度
- name: 数据名称
例子: a = tf.zeros([2, 1, 1, 3, 5])s1 = tf.squeeze(a)print(s1.shape)s2 = tf.squeeze(a, axis=1)print(s2.shape)s3 = tf.squeeze(a, axis=2)print(s3.shape) 输出结果: (2, 3, 5)
(2, 1, 3, 5)
(2, 1, 3, 5)
Boardcasting广播机制 (Boardcasting) 是一种张量复制的手段. Boardcasting 可以帮助我们扩张张量的形状但无需实际复制数据. 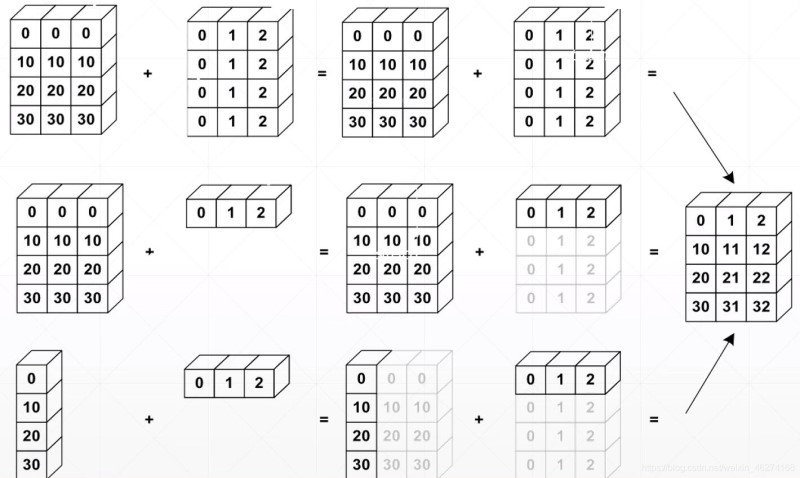
广播机制允许我们在隐式情况下进行填充, 从而使得我们的代码更加简洁, 更有效率地使用内存.
tf.boardcast_toboardcast_to: tf.broadcast_to( input, shape, name=None) 参数: - input: 输入
- shape: 数据形状
- name: 数据名称
例子: a = tf.broadcast_to(tf.random.normal([4, 1, 1, 1]), [4, 32, 32, 3])print(a.shape)b = tf.broadcast_to(tf.zeros([128, 1, 1, 1]), [128, 32, 32, 3])print(b.shape) 输出结果: (4, 32, 32, 3)
(128, 32, 32, 3)
tf.tile格式: tf.tile( input, multiples, name=None) 参数: - input: 输入
- multiples: 同一纬度上复制的次数
- name: 数据名称
例子: a = tf.zeros([4, 1, 1, 1])print(a.shape)b = tf.tile(a, [1, 32, 32, 3])print(b.shape) 输出结果: (4, 1, 1, 1)
(4, 32, 32, 3)
注: boardcast_to 和 tile 的区别在于 boardcast_to 可以在不复制内存的情况下自动扩张 tensor.
数学运算
加减乘除例子: # 定义张量t1 = tf.ones([3, 3])t2 = tf.fill([3, 3], 3.0)# 加add = t1 + t2print(add)# 减minus = t1 - t2print(minus)# 乘multiply = t1 * t2print(multiply)# 除divide = t1 / t2print(divide) 输出结果: tf.Tensor(
[[4. 4. 4.]
[4. 4. 4.]
[4. 4. 4.]], shape=(3, 3), dtype=float32)
tf.Tensor(
[[-2. -2. -2.]
[-2. -2. -2.]
[-2. -2. -2.]], shape=(3, 3), dtype=float32)
tf.Tensor(
[[3. 3. 3.]
[3. 3. 3.]
[3. 3. 3.]], shape=(3, 3), dtype=float32)
tf.Tensor(
[[0.33333334 0.33333334 0.33333334]
[0.33333334 0.33333334 0.33333334]
[0.33333334 0.33333334 0.33333334]], shape=(3, 3), dtype=float32)
log & exp例子: # loga = tf.fill([2], 100.0)print(a)b = tf.math.log(a) # 以e为底print(b)# expc = tf.ones([2])print(c)d = tf.exp(c)print(d) 输出结果: tf.Tensor([100. 100.], shape=(2,), dtype=float32)
tf.Tensor([4.6051702 4.6051702], shape=(2,), dtype=float32)
tf.Tensor([1. 1.], shape=(2,), dtype=float32)
tf.Tensor([2.7182817 2.7182817], shape=(2,), dtype=float32)
pow & sqrt例子: # 定义张量a = tf.fill([2], 4.0)print(a)# powb = tf.pow(a, 2)print(b)# sqrtc = tf.sqrt(a, 2)print(c) 输出结果: tf.Tensor([4. 4.], shape=(2,), dtype=float32)
tf.Tensor([16. 16.], shape=(2,), dtype=float32)
tf.Tensor([2. 2.], shape=(2,), dtype=float32)
矩阵相乘 @我们可以使用tf.matmul或@来实现矩阵相乘. 
例子: # 定义张量a = tf.fill([2, 2], 2)b = tf.fill([2, 2], 3)# matmulc = tf.matmul(a, b)print(c)# @d = a@bprint(d) 输出结果: tf.Tensor(
[[12 12]
[12 12]], shape=(2, 2), dtype=int32)
tf.Tensor(
[[12 12]
[12 12]], shape=(2, 2), dtype=int32)
到此这篇关于一小时学会TensorFlow2之基本操作2实例代码的文章就介绍到这了,更多相关TensorFlow2基本操作内容请搜索51zixue.net以前的文章或继续浏览下面的相关文章希望大家以后多多支持51zixue.net!
Django中常用的查询数据方法及查询对象的条件详解
Pyqt5将多个类组合在一个界面显示的完整示例 |


